Introduction
Creating a personal putting green at home enhances outdoor aesthetics and transforms any backyard into a golfer's paradise. This guide outlines four essential steps for successful installation, from selecting the perfect site to maintaining the turf for optimal performance. Homeowners must consider various factors, such as drainage, base stability, and turf selection. How can they navigate these complexities to achieve a professional-grade putting surface?
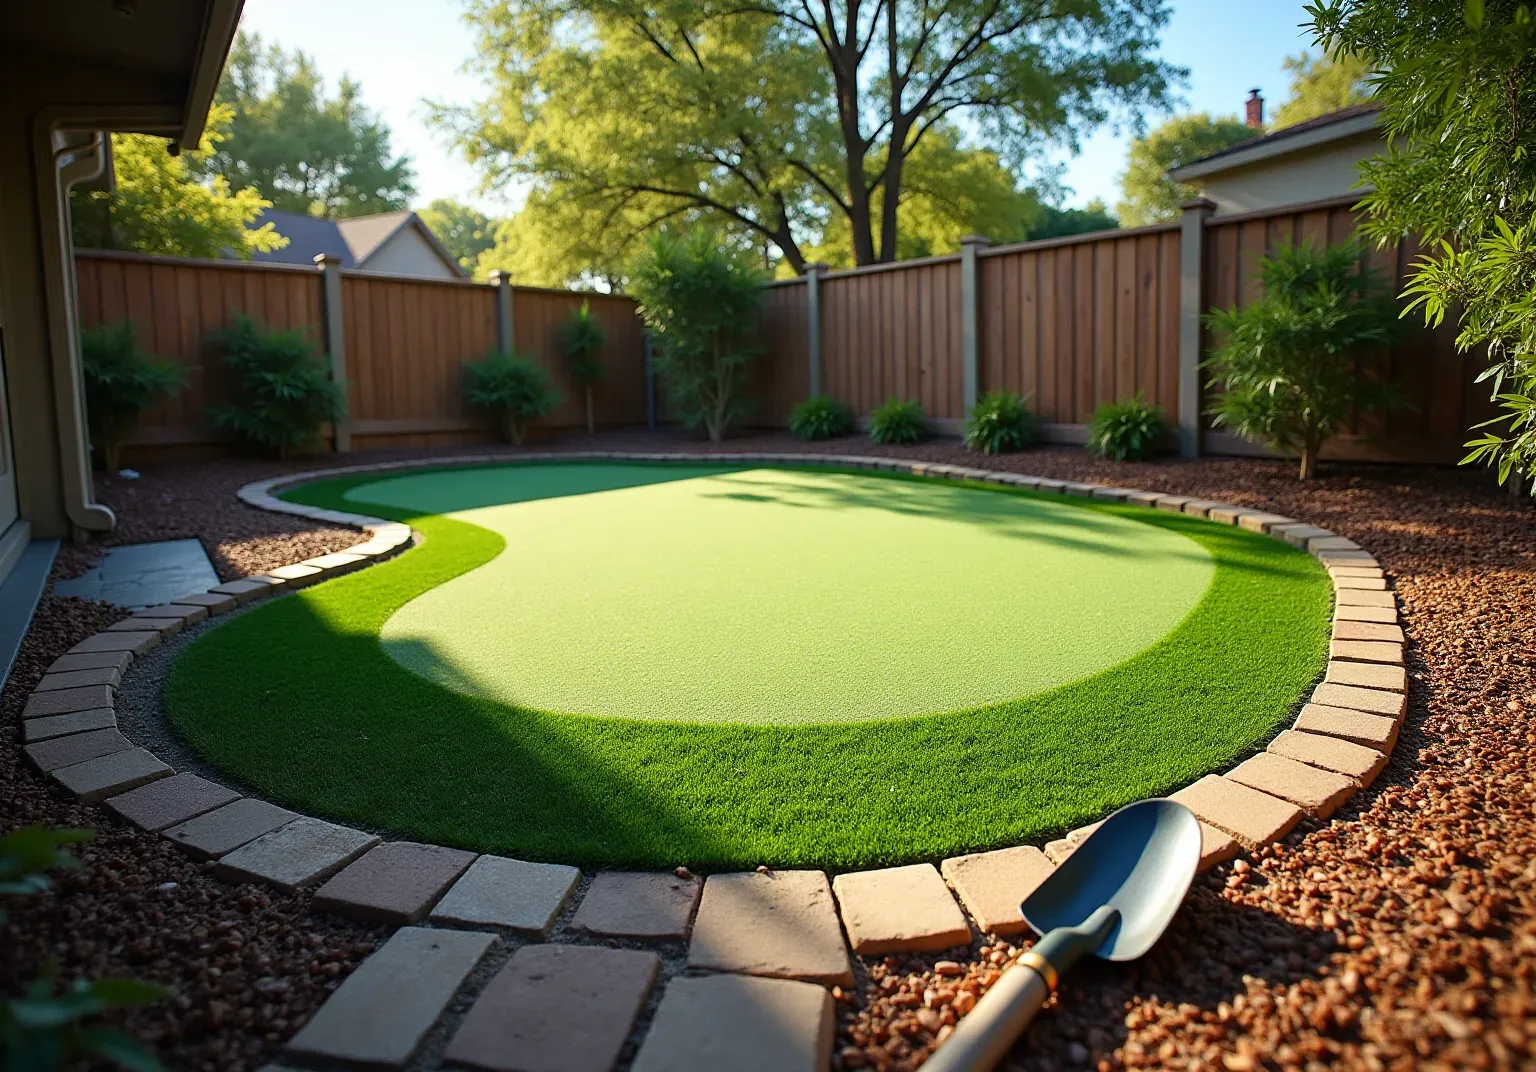
Select and Prepare the Site for Your Putting Green
- Choose the Right Location: Select a flat area that receives ample sunlight throughout the day. Avoid locations near significant trees or buildings that may create shade or drop debris onto the surface, as these factors can impair the grass's performance and longevity. is engineered to replicate the look and feel of natural grass, ensuring a premium experience for your backyard golf setup.
- : Proper drainage is essential for maintaining the health of your putting surface. If the ground tends to retain water, consider grading the site to facilitate runoff or installing a . Efficient drainage options, such as French drains or perforated pipes, can prevent water accumulation and guarantee ideal conditions for your landscape, enhancing the functionality of .
- Clear the Area: Remove any existing grass, plants, and debris from the selected site. This may involve using a shovel or sod cutter to dig out the sod to a depth of about 3-4 inches, ensuring a clean slate for your installation. The employed by California Turf Company guarantee a and consistent performance, even with frequent use.
- Mark the Layout: Utilize spray paint or stakes to of your golf area. This visual representation will assist you in accurately measuring and planning the installation, ensuring the final product fits seamlessly into your landscape.
The average expense for setting up a generally falls between $3,500 and more than $4,000, depending on the dimensions and complexity of the project. Notably, the overall cost for constructing a backyard golf area was approximately $3,500 for around 70 square meters of turf. Investing in , along with , can significantly enhance your backyard experience. Initiate your free consultation today to discuss your dream lawn and get your project underway!

Construct a Solid Base for Stability and Drainage
- Excavate the Area: Start by digging out the marked area to a depth of 3 to 5 inches, ensuring the ground is level. This excavation is crucial for creating adequate space for the base material, which supports the and facilitates proper drainage. replicates the look and feel of natural grass, providing a professional golf experience right in your backyard, with various turf cuts available to match your play style.
- Add Base Material: Fill the excavated area with crushed stone or gravel, applying a layer approximately 2 to 4 inches deep. This material must be compacted thoroughly to form a . Using a plate compactor or hand tamper is essential to achieve a tightly packed base, vital for the longevity of the installation. Our guarantees a sturdy layer that ensures and reliable performance, even with frequent use.
- Create a Slight Slope: Ensure the base has a slight slope of 1 to 2% away from any structures. This gradient is essential for , helping to avoid of the turf, which can lead to maintenance issues and surface deterioration. A well-constructed foundation will enhance the functionality and durability of your golf turf.
- Install a Drainage System (if necessary): In areas prone to drainage issues, consider incorporating a drainage system, such as perforated pipes or a French drain, within the base. This addition effectively manages excess water, ensuring that the turf remains dry and functional, thereby enhancing its usability and lifespan. With California Turf Company, you can elevate your golf game through a custom tailored to your specific play style. Contact us today to schedule your free consultation and let’s get your project underway!

Install and Secure the Artificial Turf for Optimal Performance
- Lay the Grass: Start by rolling out 's over the prepared base, ensuring it conforms to the desired shape. Allow the grass to acclimate for several hours to minimize curling, which can impact installation quality. This is designed to mimic the appearance and texture of natural grass, providing an outstanding playing surface.
- Cut to Fit: Use a utility knife to trim the edges of the grass for a precise fit in your . It’s crucial that seams between pieces are tight and properly aligned to maintain a and functionality, enhancing your overall golfing experience.
- Secure the Ground: To prevent movement, secure the grass using landscape staples or nails. Position staples every 6 to 12 inches along the edges and seams. This step is essential for preserving the integrity of the , as improper securing can lead to shifting and irregular areas, which compromises the performance of the installation.
- Add Infill: Depending on the type of grass chosen, - such as Envirofill, silica sand, or rubber granules - may be necessary. Envirofill is especially recommended for its antimicrobial characteristics and ability to provide a smooth finish. This helps weigh down the turf and enhances the natural feel underfoot. Spread the infill evenly across the surface and use a broom to work it into the fibers, ensuring a smooth and stable playing surface.
Cost Consideration: Homeowners should note that the average expense for installing a typically ranges from $18 to $25 per square foot. This information is crucial for effective project budgeting.
Planning Tip: It’s important to determine cup placement early in the design process, as this can significantly affect the overall arrangement and difficulty of the course, ensuring a more enjoyable experience. For tailored assistance, start your free consultation with today to discuss your ideal and get your project underway!

Finalize Installation and Implement Maintenance Practices
- Inspect the : Conduct a thorough walk-around of your putting green to identify any loose areas or imperfections. Address these issues promptly to maintain a smooth and even texture, which is crucial for optimal playability.
- : Establish a consistent maintenance schedule that includes with a stiff-bristled broom. This practice keeps the grass fibers upright and helps remove debris. Furthermore, rinsing the surface with a garden hose prevents dust and dirt buildup, ensuring your plants remain pristine. Regular maintenance can prolong the lifespan of from 10-15 years to 20 years or more with proper care.
- : for any signs of weed growth. Quickly eliminating weeds is crucial to stop them from spreading and undermining the quality of your lawn. Using turf-safe weed killers may be necessary for persistent issues.
- : Tailor your maintenance practices to the changing seasons. For instance, during winter, gently clear snow to avoid damaging the turf. In warmer months, consider adding sand to the infill to maintain optimal drainage and consistency of the top layer. Regular seasonal checks, including inspecting for low spots or bumps, help ensure your remains in top condition year-round. Remember to clean and disinfect the turf regularly to remove allergens and bacteria, ensuring a hygienic surface.

Conclusion
Creating a putting green at home can transform your backyard into a golfer's paradise, offering a unique blend of recreation and relaxation. This investment not only enhances personal golfing skills but also provides a distinctive outdoor space for family and friends. To achieve a professional-grade surface that elevates your golfing experience while adding aesthetic value to your property, meticulous planning and execution are essential.
Key considerations for successful installation include:
- Choosing the Right Location: Ensure proper drainage and accessibility.
- Constructing a Solid Base: A strong foundation is crucial for durability.
- Laying High-Quality Artificial Turf: Select turf that mimics the feel of natural grass.
Each phase is critical to ensure a long-lasting, functional green. Implementing a consistent maintenance routine will extend the lifespan of your installation, keeping it in pristine condition for years of enjoyment.
Embrace the opportunity to create a backyard oasis that combines leisure with the love of golf. Take the first step towards your dream lawn by consulting with professionals who can guide you through the process.
Frequently Asked Questions
What is the first step in selecting a site for a putting green?
The first step is to choose a flat area that receives ample sunlight throughout the day and to avoid locations near significant trees or buildings that may create shade or drop debris onto the surface.
Why is proper drainage important for a putting green?
Proper drainage is essential for maintaining the health of the putting surface, as it prevents water accumulation which can impair the grass's performance and longevity.
What should I do if the ground tends to retain water?
If the ground retains water, you should consider grading the site to facilitate runoff or installing a drainage system, such as French drains or perforated pipes.
How should I prepare the area before installation?
You should clear the area by removing any existing grass, plants, and debris, which may involve using a shovel or sod cutter to dig out the sod to a depth of about 3-4 inches.
How can I mark the layout of my putting green?
You can mark the layout by using spray paint or stakes to define the shape and dimensions of your golf area, which will assist in accurately measuring and planning the installation.
What is the average cost of setting up a golf practice area in Southern California?
The average cost generally falls between $3,500 and more than $4,000, depending on the dimensions and complexity of the project.
What materials are recommended for enhancing a backyard putting green?
Investing in quality materials, such as Envirofill for infill, along with professional installation from California Turf Company, can significantly enhance your backyard experience.
List of Sources
- Select and Prepare the Site for Your Putting Green
- How to Build a Putting Green in Your Backyard: 5 Tips - Motz (https://themotzgroup.com/infill_blog/tips-for-installing-a-putting-green-in-a-backyard)
- Your Guide to the Best Backyard Putting Green Turf (https://realturf.com/us/the-secret-to-a-perfect-backyard-putting-green)
- How to Built a Backyard Putting Green - A Step by Step Guide (https://kaizengolf.com.au/blogs/news/how-i-built-my-own-diy-backyard-putting-green)
- What To Know When Installing a Putting Green in Your Yard (https://syntheticturfnorthwest.com/what-to-know-when-installing-a-putting-green-in-your-yard)
- Construct a Solid Base for Stability and Drainage
- A Step-by-Step Guide to Installing Artificial Turf Grass (https://lowes.com/n/how-to/install-artificial-grass)
- Best Base for Artificial Turf: What Matters | US Turf (https://usturfsandiego.com/news/ideal-base-for-artificial-turf)
- globalsynturf.com (https://globalsynturf.com/site-base-preparation)
- How to Choose the Right Base for Artificial Grass (https://realturf.com/us/what-sub-base-is-best-for-your-artificial-grass)
- 4 Essential Facts About Installing a Sub-Base Under Your Artificial Turf | Synthetic Grass Warehouse (https://syntheticgrasswarehouse.com/blog/4-essential-facts-about-installing-a-sub-base-under-your-artificial-turf)
- Install and Secure the Artificial Turf for Optimal Performance
- A Step-by-Step Guide to Installing Artificial Turf Grass (https://lowes.com/n/how-to/install-artificial-grass)
- How to Make a Backyard Putting Green with Artificial Turf (https://themotzgroup.com/infill_blog/how-to-make-a-backyard-putting-green-with-artificial-turf)
- How To Install the Ultimate Artificial Turf Putting Green | Synthetic Grass Warehouse (https://syntheticgrasswarehouse.com/blog/how-to-install-the-ultimate-artificial-turf-putting-green)
- steeltoeu.com (https://steeltoeu.com/blog/how-to-install-artificial-turf-for-a-putting-green)
- Four Tips for a Perfect Artificial Grass Putting Green Installation - SGW Nevada (https://sgwnevada.com/blog/four-tips-for-a-perfect-artificial-grass-putting-green-installation)
- Finalize Installation and Implement Maintenance Practices
- Artificial Golf Greens Maintenance Tips (https://southwestgreens.com/blog/artificial-golf-greens-maintenance-tips)
- Artificial Turf Maintenance Guide | Cleaning & Care Tips (https://fieldturflandscape.com/maintenance/artificial-turf-maintenance-guide)
- Artificial Putting Green Maintenance: Year-Round Care Guide (https://aglgrass.com/blogs/artificial-putting-green-maintenance)
- 10 Tips for Maintaining an Artificial Grass Putting Green (https://wintergreengrass.com/10-tips-for-maintaining-an-artificial-grass-putting-green)